Pattern Alterations
Why and how to alter a pattern
Why pattern alterations are made
Patterns are altered primarily for two reasons: either to improve the fit of the garment or to alter its appearance. With both, the objective is to make the clothing fit the wearer as well as possible, and to ensure they enjoy wearing it.
The aim of fit alterations is to make a piece of clothing into something that is adapted to and suits the wearer’s individual body. Both ready-made clothes and sewing patterns are usually designed for a ‘neutral’ body type, since it is impossible to create a pattern for clothes that will fit everyone with no need for alteration. This is why we often have to refine patterns slightly.
A well-fitting garment looks good and flattering, as its proportions are right and the individual details are at the right points, with no straining wrinkles or excess ease. A well-fitting garment also feels pleasant to wear, does not restrict movement or have to be adjusted from time to time in order for the garment to look and feel good.
If you want to delve deeper into the world of pattern alterations, please take a look at our book Building the pattern!

Determining the necessity and amount of alterations
The necessity and extent of any pattern alteration depends on the difference between your own measurements and those of the size chart, as well as on the type of the garment. The need for alterations and the number of alterations relate directly to how loose the garment is – the more tailored the fit, the more adjustments may need to be made to the pattern and the bigger the adjustments may need to be. The fit of looser or stretchy garments will not necessarily need to be altered in any other way than the length, and the amount of the alteration for a loose garment may also be smaller than for a tailored piece.
Compare your own measurements to those in the size chart in order to determine how much to remove from or add to the pattern. Never use the finished measurements of the garment as a starting point for pattern alterations, unless you specifically want to alter the ease in the pattern! Instead, always preserve the pattern’s original ease (ease means the difference between the size chart and the finished measurement, and it can also be negative in garments that are made of stretch fabrics). See the detailed measuring instructions and size chart here.
You can also assess and measure where and how much the pattern needs to be altered by studying your toile. If the toile is strained, you can cut it open across the strains and allow the cut to open enough for the strain to loosen. Pin a piece of fabric under the cut, and measure the amount the piece has been opened by. Transfer this addition to your pattern. If the toile is saggy or too loose, the fabric can be sectioned and pinned off into a dart or a pleat, so that the sagginess or excess ease is removed. Afterwards, open the pleat, measure it, and remove the same amount from the pattern.

The 'slash & spread' method
We have used the so-called ‘slash and spread/overlap’ method, where alteration lines are drawn onto the pattern, cut open, with the pieces then slid on top or apart from each other. The alteration lines are drawn with a pink line in our diagrams. Sometimes the lines are cut open so that a small section is left at the end of the line, just a millimetre or so long, as a ‘hinge’, or ‘pivot point’. This pivot point stays in place when the other parts of the pattern move. A small pink dot marks the pivot point in the illustrations.

When moving the pieces, keep a large piece of pattern paper underneath them, to which you can tape pieces that are not moving, and only move those parts that need to be moved. Draw guide lines onto the pattern or the paper underneath it, to help you move the pieces and tape them at the right distances from each other. Once you’ve made the alterations, tape all the pieces carefully in place.

Remove the seam allowances from all the edges the pattern alteration will affect, and add them back in after the alterations. As pattern lines are not always straight, seam allowances do not generally correspond to the shape of the piece, and instead may distort it and complicate the alteration. All our patterns include a 1 cm (3/8”) seam allowance, unless otherwise indicated. Draw the seam allowances on the pattern 1 cm (3/8”) (or otherwise if stated in the pattern) inside the cut line. You can cut off a small section from the seam allowance at parts where the pattern is altered, usually where the slash or pivot point is at the edge of the pattern. Remember to also copy any notches onto the line and transfer them back to the new seam allowance afterwards.

Before you start
Go from the largest alterations to the smallest: First, alter the lengths of the pattern, then, if necessary, the width of the bust, waist, and hips. Sew together a toile/muslin to see whether any refinements to the pattern are still needed.
Bear in mind that if your garment is symmetrical, usually you will work on altering a half or, one fourth of its width. For example, the front pattern piece just represents half of the front, and its width will be doubled when cut out on double thickness. If, for example, you want to add 2 cm (3/4”) of ease at the bust, increase the front pattern piece by 1 cm (3/8”). Whilst if you add 2 cm (3/4”) to the waist circumference, you can add 0.5 cm (1/4”) to the front piece and another 0.5 cm (1/4”) to the back piece, because the alteration is now repeated four times.

Remember to always carry out changes to all pieces the pattern alteration affects, for example any pocket facings, pocket bags, waist bands or similar. If your garment features a lining, make sure to alter not just the shell but also the lining parts, so that all the pieces fit together. Also check whether the alteration affects the size or positioning of individual details and alter the size, shape and location of individual details as necessary, so that they look good, and so that, for example, the slits and zips are long enough to allow the garment to be put on and taken off. Also take into consideration that sometimes the measurements of the zip should be left unchanged so that you can use a standard-length zip without having to shorten it.
Lengthening and shortening a pattern
In order to determine how much you might need to alter the pattern lengths, compare your own length measurements to those of the size you have chosen. Lengthen or shorten the pattern only at the points where the length measurements differ, to correspond to the differences between the two sets of measurements at those points. Check out our size chart and learn to take your own measurements here.
If your pattern contains lengthening and shortening lines, you can lengthen or shorten the pattern directly from them, according to the instructions under the section "How to lengthen or shorten a pattern". If your pattern includes body lines (such as bust, waist, and hip lines) instead of length alteration lines, draw the lengthening or shortening lines first, following the instructions below.
Drawing the lengthening and shortening lines
Start by drawing a lengthening or shortening line: Draw the line between the two body lines, perpendicular to the grain line. On the back piece of trousers, draw the line parallel to the hip line. Always draw the lines at the same height on the front and back pieces:
- Back length: Draw the line between the bust and waist (A). If the difference from the size chart measurement is more than 3 cm (1 1/4”), you can, if you wish, draw another line above the bust, above the armhole notches (B), and divide the alteration evenly between the lines. If you are doing this, remember to draw the line to the sleeve cap, if present in the pattern, at the same height.

- Waist-to-hip: Draw a line between the waist and hip lines (A). On the back piece of trousers, draw the line parallel to the hip line (B).

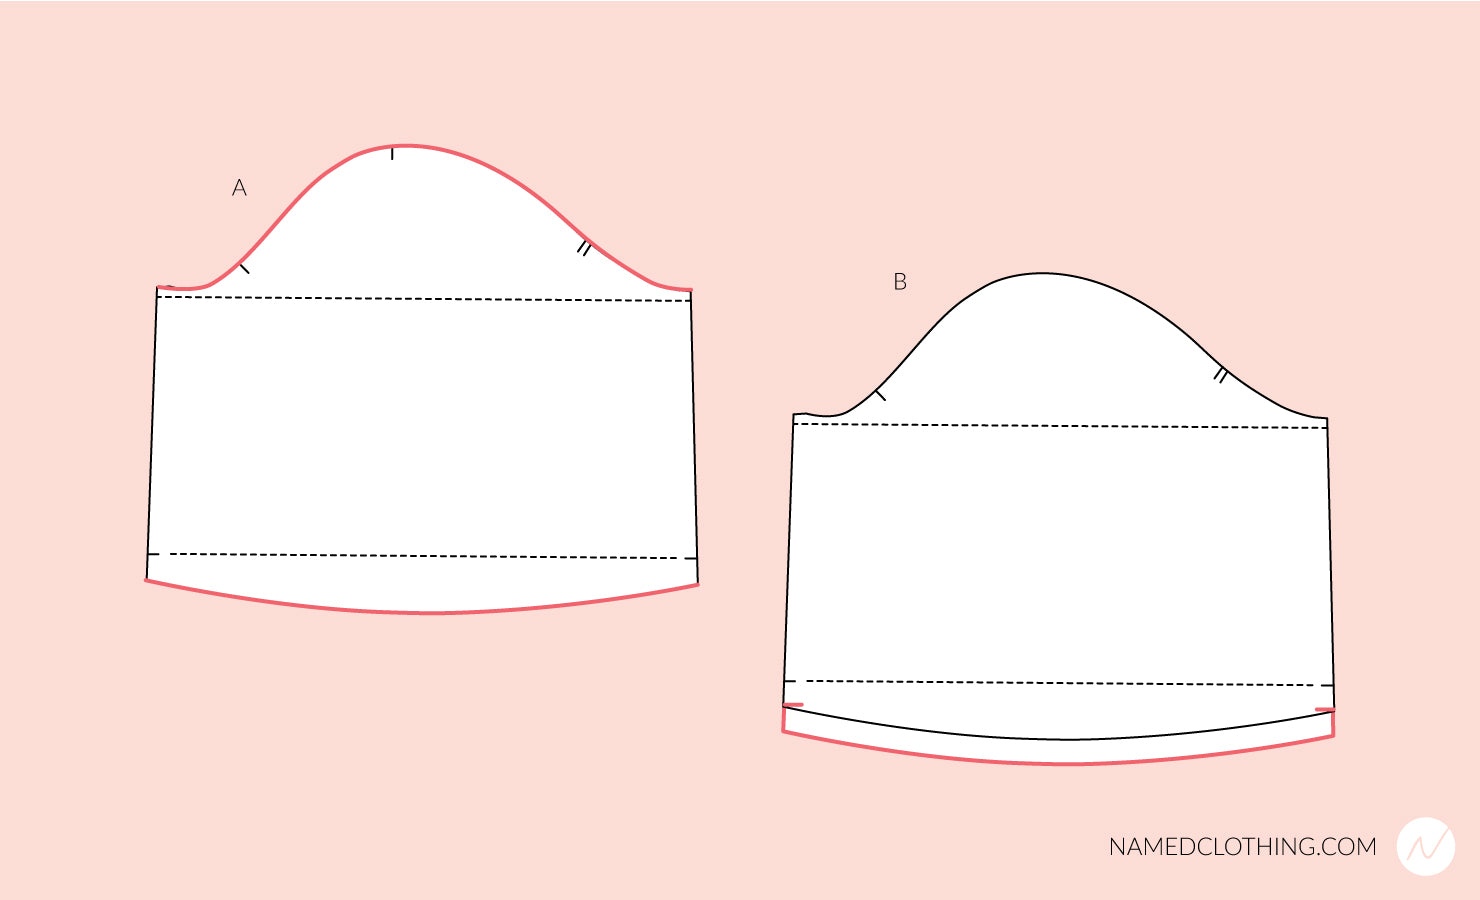
- Arm length: Draw two lines, one between the bicep and elbow lines, and the other between the elbow line and sleeve end. Distribute any difference in the arm length measurement evenly along these lines (A). If the sleeve is short, straight, or narrows or broadens evenly, you can draw just one line instead of two (B).

- Inseam: Draw two lines, one between the thigh and knee lines and one between the knee and leg end (A). Distribute any difference in the inner leg measurement evenly along these lines. If the leg is short, straight, or narrows or broadens evenly, you can draw just one line instead of two (B).

- Side length: Draw two lines, one below the hip line and the other between the first line and hem line (A). Distribute any difference in the side length evenly along these lines. If the skirt is short, straight, or narrows or broadens evenly, you can draw just one line instead of two (B).

How to lengthen or shorten a pattern
Shorten or lengthen the pattern along the line you have drawn. Always move the patterns vertically up or down. To help, you can draw a guide line onto the pattern, perpendicular to the shortening or lengthening line, before cutting the pieces, ensuring that you make the alteration in the direction of the line.
- Cut the pattern into two pieces along the length alteration line. (A)
- When lengthening, tape the lower pattern piece to the backing paper. Draw a guideline onto the top of the piece, the required distance from the lower piece, and tape the higher piece to this line. (B)
- When shortening, tape the pieces correspondingly so that they are overlapping the necessary amount. (C)

- True the pattern edges by drawing them smooth and measuring that all matching edges are of equal length.

Truing the altered patterns
Altered patterns should always be finalised before adding in the seam allowances, in order to be sure that the pieces are smooth in shape and can still be sewn together.
Truing pattern edges
Draw the outer lines of the altered pattern neatly and smoothly, for example if openings or corners have been formed along these lines during the process.
Truing darts
If you altered the pattern at the dart, redraw the sides of the darts afresh, without any breaks in the dart (A). Neaten up the end of the dart and even out the sides: Tape a piece of paper under the pattern at the end of the dart (B). Fold the dart together along the centre line so that the sides meet, yhen fold the dart in the direction it will be ironed in in the finished piece (C). Hold the pattern tightly in place and draw the seam neatly and smooth at the end of the dart. (D) Cut along the line with a circular cutter, or draw along the line with a roller in order to copy it onto all layers and then open the dart and cut the edge neatly along the line with scissors. (E)

Truing seams
Measure to make sure that the altered seams match up with their opposite pieces and that the notches correspond. Measure the seams just in the altered area, for example from one edge to the other or to the nearest notch. Note that sometimes pieces, such as sleeve caps, feature easing, i.e. the piece is longer than the piece it's supposed to be sewn onto. Take this easing into account when measuring the pieces and ensure you retain the amount of ease stated. In our Post-2020 patterns any such easing and the amount used are always stated in the pattern.

If a piece has shortened or lengthened, first make sure that there are no errors in the pattern that would create differences. If there is a difference of 4 mm, for example, even out the seam by removing 2 mm from one piece and adding 2 mm to the other.

Truing angles
Check that any angles in the pattern are right angles, or otherwise line up with the pieces to be joined to them. If this is not the case, neaten up the angle.
Right angles: Draw the angle onto the piece again at 90 degrees with a ruler, and merge the line neatly with the original line. Place any pieces to be sewn together against each other and check that the line is smooth.

Other angles: Place the pieces to be sewn together against each other and draw a line neatly and smoothly, using a curve ruler, for example.

Truing pattern markings
The markings indicating the locations of individual pattern details, such as pockets, may be moved when making alterations. Copy the new locations for the markings at your discretion, as far as is possible, placing them in the same positions as in the original pattern.

Adding seam allowances
When you have altered and trued your pattern pieces, add the seam allowances to them and move the notches to the edge of the seam allowance. It may be a smart idea to trace the entire finished pattern afresh onto pattern paper, and add the seam allowances then, so that your altered pattern is neat and easy to store for future use.

Moving bust darts
The bust dart should always be placed so that it is in the right spot in relation to the most prominent point of the bust (apex). If the dart is too high or low, or the tip of the dart is too close to, or far from your apex, the dart does not contour the body well enough.
The apex of your bust is most often where the nipple is. It is easiest to estimate your apex placement on the pattern by drawing the apex on a toile, and comparing it to the apex marked on the pattern. If you haven’t sewn a toile yet, you can also try to hold the paper pattern against your body, and copy your apex on the pattern piece. Once you have marked the apex on your paper pattern, move and shorten or lengthen the dart to match the apex.
Moving the dart
The dart should point directly towards your apex.
- Draw the seam allowances where necessary, and remove them if you wish.
- Mark your apex on the pattern (A).
- Draw a rectangle around the dart, and cut the dart out along the line (B).

- Move the dart vertically up or down, so that its center line points directly to the apex.
- Tape in place, and true the side seam and the dart.
- Add or smooth the seam allowances.

Lengthening or shortening the dart
The bust dart should end 2 – 5 cm (3/4 – 2”) before your bust apex, but the correct dart length depends on the size and shape of the bust. It is easiest to determine whether the dart length is right for your bust by looking at the toile: If the tip of the dart is too close to your bust apex, the dart looks pointy and angular. If the tip is too far from your apex, there’s some bunching around the dart tip.
- To shorten the dart, mark a shortening point on the center line of the dart, at the desired distance from the original tip. Draw new sides for the dart from the shortening point to the end of the dart (C).
- To lengthen the dart, first continue the center line of the dart beyond the original tip. Mark a lengthening point on the line, at the desired distance from the original tip. Draw new sides for the dart from the shortening point to the end of the dart (C).

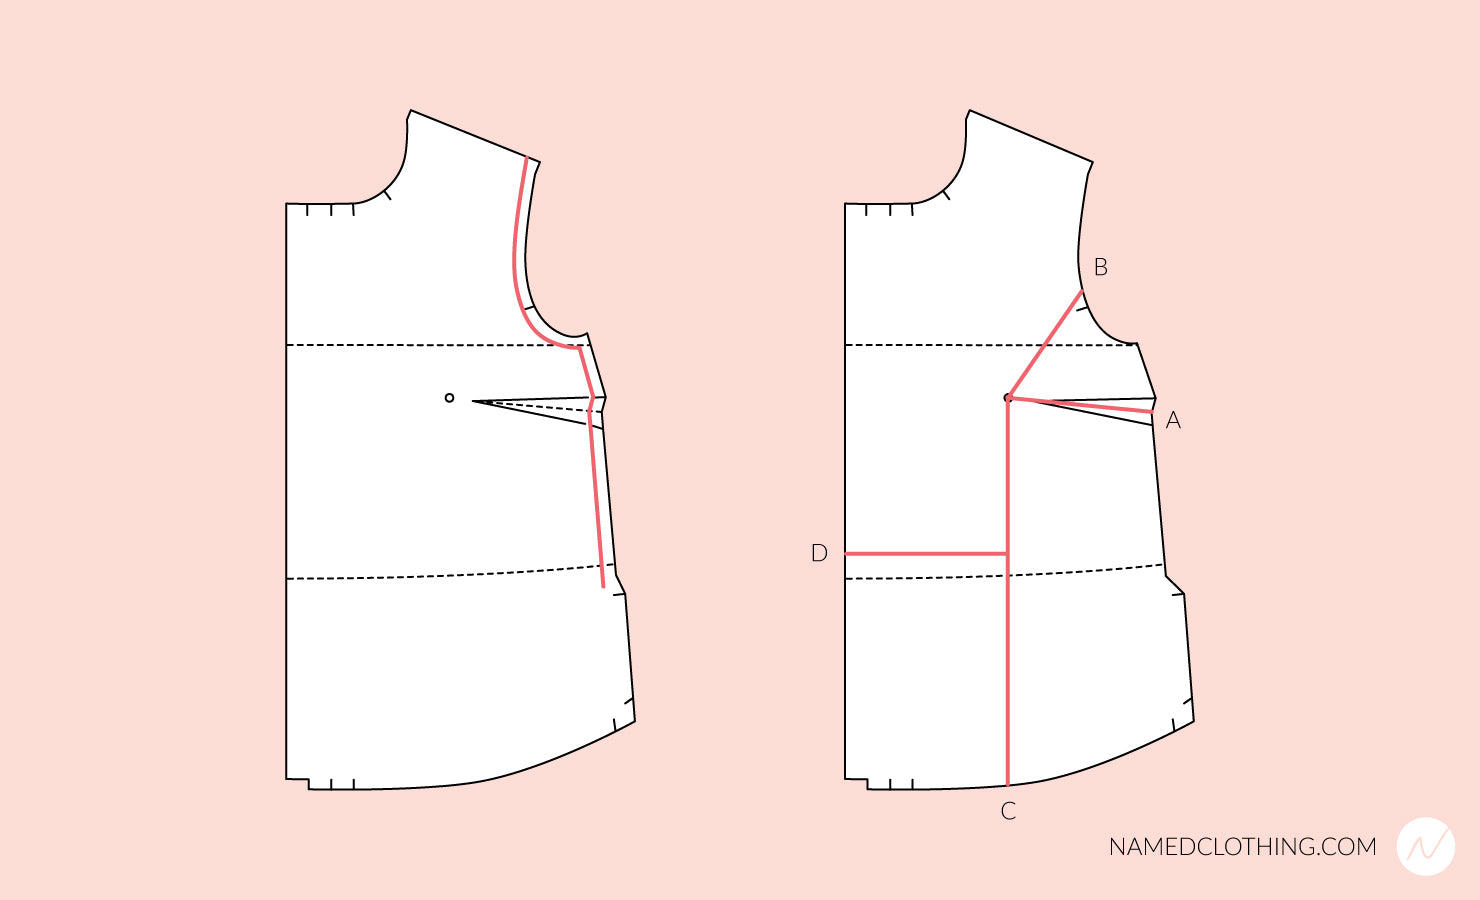
Full bust adjustment (FBA)
It’s easy to estimate whether you need to make a full bust alteration or not, by comparing your own full and high bust measurements to those of our size chart. If your full bust circumference is larger than the size chart's, making a full bust adjustment is probably a good idea.
- Draw the seam allowances where necessary, and remove them if you wish.
- Draw a line along the center of the bust dart to the bust apex (A). Draw another line from above the sleeve notch, to the bust apex (B). Draw a third, vertical line from the bust apex to the hem (C). Draw yet another line from the line C to the center front (D).

- Cut the lines open, leaving pivot points on the armhole and apex.
- Slide the side pieces apart, to open the front the desired amount. This will cause the bust dart to spread. Make sure the line C remains vertical. Slide the center piece down to level it with the hem, making sure the center front is in line. Tape in place.

- True the armhole, side and hem edges. True the bust dart by drawing its sides until they intersect. True the end of the bust dart.
- Add or smooth the seam allowances.

Small bust adjustment (SBA)
You can estimate whether you need to make a small bust alteration by comparing your own full and high bust measurements to those of our size chart. If your full bust circumference is smaller than the size chart’s, you can alter your pattern with a small bust adjustment.
- Draw the seam allowances where necessary, and remove them if you wish.
- Draw a line along the center of the bust dart to the bust apex (A). Draw another line from above the sleeve notch, to the bust apex (B). Draw a third, vertical line from the bust apex to the hem (C). Draw yet another line horizontally from the line C to the center front (D).
- Cut the lines open, leaving pivot points on the armhole and apex.
- Slide the side pieces to overlap with the center pieces by the desired amount. This will cause the bust dart to narrow. Make sure the line C remains vertical. Slide the center piece up to level it with the hem, making sure the center front is in line.

- True the armhole, side and hem edges. True the bust dart by drawing its sides until they intersect. True the end of the bust dart.
- Add or smooth the seam allowances.

Wide chest alteration
If your garment or toile feels tight around the chest, and there are taut, horizontal folds at the chest area, it is likely that you need to make a wide chest alteration on your front bodice piece. Note that the wide chest alteration only adds width to your piece, while the FBA also adds length.
- Draw the seam allowances where necessary, and remove them if you wish.
- Draw a line from the neckline and shoulder seam corner, to the center of the bust dart (A). Continue the line across the bust dart, and from there to the side seam at waist.
- Draw another line from the armhole and shoulder seam corner to the line A (B). Draw two more lines on either side of the bust dart, from the side seam to the point where line A meets the dart (C).

- Cut the lines open, leaving pivot points on the shoulder and side seam.
- Slide the side pieces apart by the desired amount, to open and spread the piece, and lengthen the bust dart. Tape in place.

- True the shoulder and side edges, as well as the bust dart.
- Add or smooth the seam allowances.

Narrow chest alteration
If your garment or toile feels loose at the chest area, and there are baggy vertical folds at the chest and close to the armscyes, you might need to reduce the excess ease by making a narrow chest alteration to your front bodice piece. Note that the narrow chest alteration only reduces width from your piece, while the SBA also removes length.
- Draw the seam allowances where necessary, and remove them if you wish.
- Draw a line from the neckline and shoulder seam corner, to the center of the bust dart (A). Continue the line across the bust dart, and from there to the side seam at waist.
- Draw another line from the armhole and shoulder seam corner to the line A (B). Draw two more lines on either side of the bust dart, from the side seam to the point where line A meets the dart (C).

- Cut the lines open, leaving pivot points on the shoulder and side seam.
- Slide the side pieces inwards, to overlap the pieces by the desired amount. This causes the bust dart to shorten. Tape in place.

- True the shoulder and side edges, as well as the bust dart.
- Add or smooth the seam allowances.

Broad back alteration
You know you need a broad back alteration if your toile or garment feels too tight at the upper back, making it hard to lift your arms and reach them to the front. If you have made a toile, you can cut it open vertically next to the back armscyes, to figure out how much excess ease you will need to add.
- Draw the seam allowances where necessary, and remove them if you wish.
- Draw a short, slanted line from the corner where the shoulder seam and armhole meet. Then continue the line down to the side seam at waist (A). The line should be long and slanted enough to not touch the armhole. Draw a horizontal line from the corner where the armhole and side seam meet, to the line A (B). Draw a third line from just above the armhole notches to the line A (C).

- Cut the lines open, leaving pivot points to their outer ends.
- Slide the side pieces outward, to let the pattern open the desired amount. Tape in place.

- True the shoulder, armhole and side edges.
- Add or smooth the seam allowances.

Narrow back alteration
If your garment or toile feels loose and baggy at your upper back, it might need a narrow back alteration. You can pin the toile or garment vertically next to the back armscyes to figure out how much ease to remove from the pattern. Remember to take only as much as needed, so that you can still lift and reach your arms to the front without the garment restricting your movement.
- Draw the seam allowances where necessary, and remove them if you wish.
- Draw a short, slanted line from the corner where the shoulder seam and armhole meet. Then continue the line down to the side seam at waist (A). The line should be long and slanted enough to not touch the armhole. Draw a horizontal line from the corner where the armhole and side seam meet, to the line A (B). Draw a third line from just above the armhole notches to the line A (C).

- Cut the lines open, leaving pivot points to their outer ends.
- Slide the side pieces inward, to overlap them by the desired amount. Tape in place.

- True the shoulder, armhole and side edges.
- Add or smooth the seam allowances.

Widening the waist
It’s easy to notice if a garment is too tight around the waist: it simply feels uncomfortable, may restrict movement and some taut horizontal strains might appear at the waist.
Adding width to the waist on bodice patterns
Make the alteration equally to the front and back piece.
- Draw the seam allowances where necessary, and remove them if you wish.
- Draw a line from the armhole and side seam corner to waist, close to the side seam (A).
- Cut the line open, leaving a pivot point to the armhole end.

- Spread the pattern by the desired amount and tape in place.
- True the waist and armhole edges. If your pattern has a bust dart, true the bust dart.
- Add or smooth the seam allowances.

Adding width to the waist on bottom patterns
Make the alteration equally to the front and back piece.
- Draw the seam allowances where necessary, and remove them if you wish.
- Draw a line from the side seam at hip level, to the waist, close to the side seam (A).
- Cut the line open, leaving a pivot point to the hip.

- Spread the pattern by the desired amount and tape in place.
- True the waist and side edges.
- Add or smooth the seam allowances.

Widening the waist from darts
If you need to widen the pattern by a lot, it is smart to add some ease by narrowing the waist darts, in addition to using the method above. This prevents the shape of the side seam from becoming too tapered or distorted.
- Draw the seam allowances where necessary, and remove them if you wish.
- Divide the ease that you want to add by narrowing the darts by two. Mark it on either side of the dart, inside the original dart (A).
- Draw new sides for the dart from the markings to the tip (B).
- True the dart end and waist. Add or smooth the seam allowances.

Narrowing the waist
If the garment or toile is too loose around the waist, it does not contour the body. A skirt or a pair of pants might keep sliding down towards the hip.
Removing width from the waist on bodice patterns
Make the alteration equally to the front and back piece.
- Draw the seam allowances where necessary, and remove them if you wish.
- Draw a line from the armhole and side seam corner to waist, close to the side seam (A).
- Cut the line open, leaving a pivot point to the armhole end.
- Slide the side piece inwards, overlapping it by the desired amount, and tape in place.
- True the waist and armhole edges. If your pattern has a bust dart, true the bust dart.
- Add or smooth the seam allowances.

Removing width from the waist on bottom patterns
Make the alteration equally to the front and back piece.
- Draw the seam allowances where necessary, and remove them if you wish.
- Draw a line from the side seam at hip level, to the waist, close to the side seam (A).
- Cut the line open, leaving a pivot point to the hip.
- Slide the side piece inwards, overlapping it by the desired amount, and tape in place.
- True the waist and side edges.
- Add or smooth the seam allowances.

Narrowing the waist from darts
If you need to remove a lot of ease from the waist of your pattern, it is smart to remove some of it by widening the waist darts, in addition to using the method above. This prevents the shape of the side seam from becoming too curved or distorted.
- Draw the seam allowances where necessary, and remove them if you wish.
- Divide the ease that you want to remove by widening the darts by two. Mark it on either side of the dart, outside the original dart (A).
- Draw new sides for the dart from the markings to the tip (B).
- True the dart end and waist. Add or smooth the seam allowances.

Wide hip alteration
You should widen your pattern at the hip, if the garment or toile feels tight around the hips, and strained horizontal folds appear at the hip level. A fitted skirt with insufficient ease at the hip might also start climbing up towards the waist when worn.
Make the alteration equally to the front and back piece.
- Draw the seam allowances where necessary, and remove them if you wish.
- Draw a line from the waist and side seam corner to the hem, a couple of centimeters apart from the side (A). Draw another line on top of the hip line, from the side to the line A (B).
- Cut the lines open, leaving pivot points on the side seam.

- Slide the side pieces apart from the main pattern, to open the pattern by the desired amount at the hip. However, make sure the pieces are together at the hem.
- Tape in place, and true the side and hem edges.
- Add or smooth the seam allowances.

Narrow hip alteration
You can tell that your pattern has too much ease at the hip, if the garment or toile looks baggy and “empty” around the hips, or if the side seam curve looks too curved for your figure. Loose vertical folds might even form on the sides of the hip level.
Make the alteration equally to the front and back piece.
- Draw the seam allowances where necessary, and remove them if you wish.
- Draw a line from the waist and side seam corner to the hem, a couple of centimeters apart from the side (A). Draw another line on top of the hip line, from the side to the line A (B).
- Cut the lines open, leaving pivot points on the side seam.
- Slide the side pieces inwards to overlap them with the main pattern by the desired amount at the hip. However, make sure the pieces are together at the hem.
- Tape in place, and true the side and hem edges.
- Add or smooth the seam allowances.

Prominent butt adjustment
If your pattern has insufficient ease around the butt area, the garment or the toile feels tight around the butt, the side seam pulls towards the back at hip, and the waist sits lower on the back than on the front. In skirts, the back hemline might also seem shorter than the front. Taut creases might appear around the buttocks.
Prominent butt adjustment for trousers
- Draw the seam allowances where necessary, and remove them if you wish.
- Draw a line along the center line of the back waist dart, or darts, if your pattern has two. (A)
- Draw another line from the dart (closer to the center back) to the inseam, approximately at the mid-thigh level (B).
- Then draw a line from the waist and side seam corner to the tip of the dart(s), and from there to the center back, in a straight angle (C).
- Draw one more line from the crotch curve to the inseam (D).
- Cut the lines open, leaving pivot points as indicated.

- Slide the top pieces up to add the desired amount of length to the line D.
- Spread the crotch piece to the side, to add width to the line B, then slide the top pieces to the side to spread the dart(s) at line(s) A, and to level the crotch.
- Finally, slightly spread the small crotch piece to open the line D.
- Tape in place and true the waist, crotch, inseam and darts.
- Add or smooth the seam allowances.

Prominent butt adjustment for skirts
- Draw the seam allowances where necessary, and remove them if you wish.
- Draw a line along the center line of the back waist dart, or darts, if your pattern has two. (A)
- Continue the line (of the dart closer to the center back) straight down to the hem (B).
- Draw another line from the dart (closer to the center back) to the center back, in a straight angle (C).
- Then draw one more line from the waist and side seam corner to the tip of the dart (closer to the side seam, and from there to the tip of the other dart) (D).
- Cut the lines open, leaving pivot points as indicated.

- Slide the top pieces up and towards the center back, to add the desired amount of length to the line C.
- Slide the smaller hem piece towards the center back, to add the desired amount of width to the line B. Keep the hemline parallel.
- Spread the dart(s) as much as needed to level the center back.
- Tape in place and true the waist, crotch, inseam and darts.
- Add or smooth the seam allowances.

Flat butt adjustment
If your pattern has too much ease around the butt area, the garment or the toile sags around the butt, loose folds might appear at the sides and under the buttocks, and you might feel the urge to pull the garment up from the back waist to remove the bunching. A skirt hemline might appear to be longer in the back than on front.
Flat butt adjustment for trousers
- Draw the seam allowances where necessary, and remove them if you wish.
- Draw a line along the center line of the back waist dart, or darts, if your pattern has two. (A)
- Draw another line from the dart (closer to the center back) to the inseam, approximately at the mid-thigh level (B).
- Then draw a line from the waist and side seam corner to the tip of the dart(s), and from there to the center back, in a straight angle (C).
- Draw one more line from the crotch curve to the inseam (D).
- Cut the lines open, leaving pivot points as indicated.
- Slide the top pieces down to remove the desired amount of length from the line D.
- Slide the crotch piece inwards, to remove width from the line B, then slide the top pieces inwards too, to make the dart(s) narrower at line(s) A, and to level the crotch.
- Finally, slightly slide the small crotch piece inwards to overlap at the line D.
- Tape in place and true the waist, crotch, inseam and darts.
- Add or smooth the seam allowances.

Flat butt adjustment for skirts
- Draw the seam allowances where necessary, and remove them if you wish.
- Draw a line along the center line of the back waist dart, or darts, if your pattern has two. (A)
- Continue the line (of the dart closer to the center back) straight down to the hem (B).
- Draw another line from the dart (closer to the center back) to the center back, in a straight angle (C).
- Then draw one more line from the waist and side seam corner to the tip of the dart (closer to the side seam, and from there to the tip of the other dart) (D).
- Cut the lines open, leaving pivot points as indicated.
- Slide the top pieces down, to remove the desired amount of length from the line C.
- Slide the smaller hem piece inwards, overlapping it with the main piece, to remove the desired amount of width from the line B. Keep the hemline parallel.
- Close the dart(s) as much as needed to level the center back.
- Tape in place and true the waist, crotch, inseam and dart(s).
- Add or smooth the seam allowances.

Broad shoulder adjustment
You know you need to make a broad shoulder adjustment, when the garment or the toile feels tight around the shoulders, and the shoulder seam of the garment is too short, pulling the sleeve cap over to your shoulder. Taut vertical folds might also appear on the front and back of the bodice, from shoulder to shoulder.
Make the alteration equally to the front and back piece.
- Draw the seam allowances where necessary, and remove them if you wish.
- Draw a line from the center of the shoulder seam, to the armhole, just above the notch (A).
- Draw another line from the shoulder seam and armscye corner to the line A (B).
- Cut the lines open, leaving pivot points on the armscye.

- Tape your pattern on a paper, and draw a guideline on it, parallel to the shoulder seam.
- Now slide the shoulder pieces apart from the main piece by the desired amount, keeping the shoulder edge parallel to the guideline.
- Tape in place and true the shoulder and the armscye.
- Add or smooth the seam allowances.

Narrow shoulder adjustment
If the garment or the toile feels loose around the shoulders, and the shoulder seam is too long, dropping the sleeve cap over the shoulder towards the arm, you can fix it by making a narrow shoulder adjustment.
Make the alteration equally to the front and back piece.
- Draw the seam allowances where necessary, and remove them if you wish.
- Draw a line from the center of the shoulder seam, to the armhole, just above the notch (A).
- Draw another line from the shoulder seam and armscye corner to the line A (B).
- Cut the lines open, leaving pivot points on the armscye.
- Tape your pattern on a paper, and draw a guideline on it, parallel to the shoulder seam.
- Now slide the shoulder pieces inwards, overlapping them with the main piece by the desired amount. Keep the shoulder edge parallel to the guideline.
- Tape in place and true the shoulder and the armscye.
- Add or smooth the seam allowances.

Straight shoulder adjustment
You know you need to make a straight shoulder adjustment, if slanted strain folds appear on the garment or the toile, running from the shoulder to your chest. The side seams and the sleeves of the garment might also feel too short, and the waist seam or hemline might curve upwards at the sides.
Make the alteration equally to the front and back piece.
- Draw the seam allowances where necessary, and remove them if you wish.
- Draw a slanted line starting from the shoulder seam and neckline corner, until just below the armscye. Pivot below the bust line and continue the line parallel to the bust line, all the way to the side seam. (A).
- Draw another line from the shoulder seam and armscye corner to the line A (B).
- Cut the lines open, leaving pivot points on the shoulder.

- Slide the shoulder pieces up to open the line A below the bust by the desired amount. Keep the gap parallel to the bust line.
- Tape in place and true the shoulder and the side seam.
- Add or smooth the seam allowances.
Sloping shoulder adjustment
You might want to consider making a sloping shoulder adjustment, if slanted loose folds appear on the garment or the toile, running from the sides of the neckline towards your underarms. The side seams and the sleeves of the garment might also feel too long, and the waist seam or hemline might curve downwards at the sides.
Make the alteration equally to the front and back piece.
- Draw the seam allowances where necessary, and remove them if you wish.
- Draw a slanted line starting from the shoulder seam and neckline corner, until just below the armscye. Pivot below the bust line and continue the line parallel to the bust line, all the way to the side seam. (A).
- Draw another line from the shoulder seam and armscye corner to the line A (B).
- Cut the lines open, leaving pivot points on the shoulder.
- Slide the shoulder pieces down to cloe the line A below the bust by the desired amount. Keep the bust lines parallel.
- Tape in place and true the shoulder and the side seam.
- Add or smooth the seam allowances.

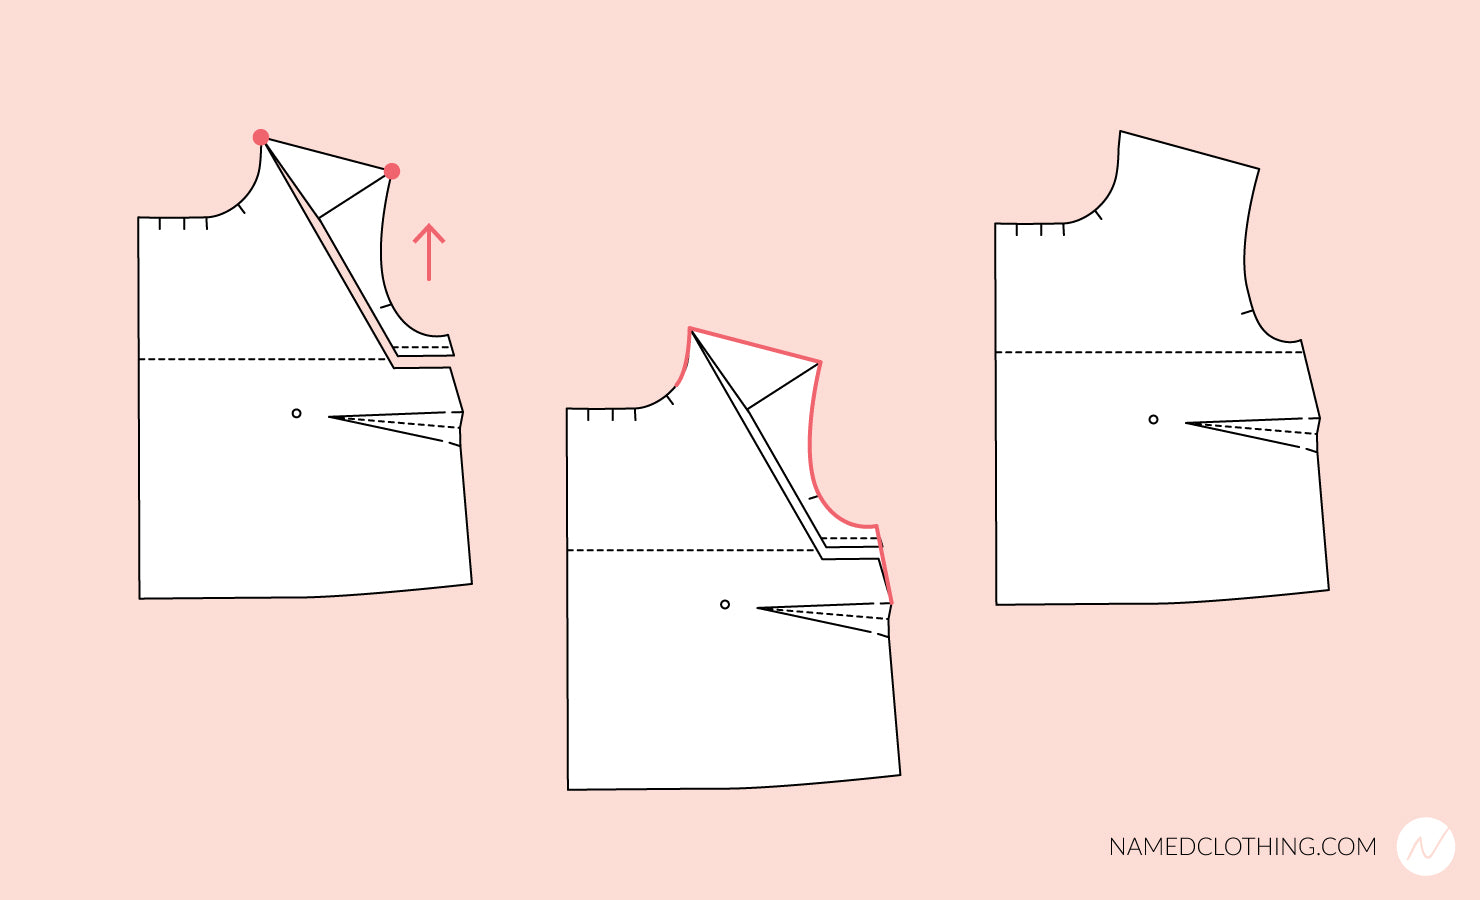
How to eliminate shirt back yoke
Sometimes you prefer to have your shirt without the back yoke. Here's how you can combine the back yoke pattern with the shirt back pattern to omit the yoke, and have one complete back pattern instead.
- Remove the seam allowances where necessary (A).
- Keeping the center back aligned, tape the yoke and the back pattern together. Draw an alteration line from where the opening between the pieces starts, to the shoulder seam (B).

- Cut the line open, leaving a pivot point to the end. Rotate the shoulder piece, closing the gap between the yoke and the back piece (A).
- Measure the opening on the shoulder, and remove its width from the armscye at the shoulder (B).

- Smooth and true the altered edges (A).
- Add the seam allowances back in (B).

How to eliminate back yoke on a shirt with a pleat
Sometimes you prefer to have your shirt or dress without the back yoke. Here's how you can combine the back yoke pattern with the back pattern without removing the back pleat. The trick is to simply move the back pleat up to the neckline, which you can then sew closed down until the original pleat.
- First, extend the back of the yoke to match with the back piece. Do that by mirroring the width of the pleat from your yoke pattern. This way the pattern edges will be correctly shaped (A).
- Remove the seam allowances where necessary (B).
- Keeping the center back aligned, tape the yoke and the back pattern together (B).

- Draw an alteration line from where the opening between the pieces starts, to the shoulder seam (A).
- Cut the line open, leaving a pivot point to the end. Rotate the shoulder piece, closing the gap between the yoke and the back piece (B).
- Measure the opening on the shoulder, and remove its width from the armscye at the shoulder (C).

- Smooth and true the altered edges. If you wish, draw a stitching line for the pleat down to the original pleat, to sew it partly closed (A).
- Add the seam allowances back in (B).

Narrowing the neckline
If your bodice pattern feels too loose around the neck, it’s a good idea to alter the neckline slightly narrower. You can pin your garment or toile at the center back to determine how much narrower you would like the collar to be. Remember to divide the amount by four, and remove it from the front and back piece, as well as the collar and collar stand pieces.
- Draw the seam allowances where necessary, and remove them if you wish.
- Draw a line down from the shoulder seam, and continue it in a 90° angle to the front/back (A). Make sure to draw the line on the same spot on the shoulder in both the front and back. Draw another line from the center of the neckline to the line A (B).

- Cut along the alteration lines, and tape the biggest piece on a large piece of pattern paper. Draw guidelines on the backing paper along the shoulder seam and front/back.
- Slide the smaller pieces along the guidelines so that they overlap the desired amount at the line B. Tape in place.

- True the neckline curve.
- Add or smooth the seam allowances.

- Alter the collar and collar stand: Draw alteration lines C & D on the same spots on the collar pieces, as where the line B was on the bodice pieces.
- Cut the lines open. Slide and overlap at these lines by the same amount as in the bodice patterns. True the edges and add or smooth the seam allowances.

Widening the neckline
If your shirt feels uncomfortably tight around the neck, you can alter the collar and the neckline wider. To determine how much to add, you can open the collar button, and pin the collar closed where it feels comfortable. Measure the distance of the button and the buttonhole to see how much to add. Remember to divide the amount by four and add it on the front and back piece, as well as the collar and collar stand pieces.
- Draw the seam allowances where necessary, and remove them if you wish.
- Draw a line down from the shoulder seam, and continue it in a 90° angle to the front/back (A). Make sure to draw the line on the same spot on the shoulder in both the front and back Draw another line from the center of the neckline to the line A (B).

- Cut along the alteration lines.
- Slide the smaller pieces along the shoulder seam and front/back, so that they open the desired amount at the line B. Tape in place.

- True the neckline curve.
- Add or smooth the seam allowances.

- Alter the collar and collar stand: Draw alteration lines C & D on the same spots on the collar pieces as where the line B was on the bodice pieces.
- Cut the lines open. Slide and open at these lines by the same amount as in the bodice patterns. True the edges and add or smooth the seam allowances.

Kajo: Lengthening and shortening the bodice or the sleeve
- Bodice length: Draw the length alteration line right under the curve of the sleeve (A). Remember to also draw lines to the front and back facings, at the same level.
- Sleeve length: Draw the line perpendicular to the upper sleeve seam (B).

- Cut the pattern into two pieces along the length alteration line.
- When lengthening, tape the upper pattern piece to the backing paper. Draw a guideline below the piece, at the required distance from the upper piece, and tape the lower piece to this line.

- When shortening, tape the pieces correspondingly so that they overlap the required amount.

- Copy the curved front seam shape from the original pattern.
- True the pattern edges by drawing them smooth and measuring that all matching edges are of equal length.


Kielo: full bust adjustment with an added bust dart
You can make a full bust adjustment (FBA) to the Kielo dress or jumpsuit pattern in two ways: with or without a bust dart. Adding a dart is recommended, if your fabric is very stiff (such as heavy ponte) or if you have to alter the bust size by a great deal, one size or more. If your fabric is light, drapey or very stretchy, we recommend the full bust adjustment without a dart.
- Draw the seam allowances where necessary, and remove them if you wish.
- Draw a line from the center of the shoulder seam to the bust apex (A). Continue the line vertically to the hem (B). Draw another line from above the armhole notch to the bust apex (C), and then yet another, horizontal line from the midpoint of the shoulder seam and the notch at the armhole, to the line A (D).

- Cut the lines open leaving pivot points to the spots indicated.
- Slide the side pieces apart to open the pattern at the apex by the desired amount, and to spread the bust dart. Tape in place.

- Draw a line from the center of the opening on the armscye, to the bust apex. Mark a tip for the bust dart on the line A, 2 – 5 cm (3/4 – 2”) from the apex. The right distance depends on the size and shape of your pattern and bust, as well as of the depth of the dart: the larger the size, the further apart from the apex the dart should be. The deeper the dart is, the longer it should be, to avoid it from becoming very steep. Draw the dart from the tip to the root.
- True the bust dart, the pattern edges and markings, and add the seam allowances back in, if necessary.

Kielo: Full bust adjustment
There are two ways to make a full bust adjustment (FBA) to the Kielo dress or jumpsuit: with or without a bust dart. If your fabric is light, drapey or very stretchy, we recommend this full bust adjustment without a dart. Adding a dart is recommended, if your fabric is very stiff (such as heavy ponte), or if you have to alter the bust size by a great deal, one size or more.
- Draw the seam allowances where necessary, and remove them if you wish.
- Draw a line from the center of the shoulder seam to the bust apex (A). Continue the line vertically to the hem (B). Draw another line from the armhole notch to the bust apex (C), and then another from above the sleeve notch to the apex (D). Draw one more, horizontal line from the midpoint of the shoulder seam and sleeve notch, to the line A (E).

- Cut the lines open, leaving pivot points on the armhole and shoulder.
- Slide the side pieces apart to open the front the desired amount. Tape in place.

- True the shoulder, armhole and hem edges.
- Add or smooth the seam allowances.

Kielo: Adding a back contour dart
If you want to add shape and contour to the back your Kielo dress or jumpsuit, you can do that by adding contour waist darts. It’s easy to decide how much to remove and where to place the darts using a toile, but you can also add the darts before making the first toile. If you have a toile, pin the excess ease off from the back at the desired spot, into two contour darts, and measure the depth of one dart, as well as its distance from the center back seam. Note that one dart shouldn't be deeper than 3 cm (1 1/4”).
- On the back piece, mark the placement for the dart on the waist, at the desired distance from the center back (A). You can use a distance of 5.5–8 cm (2 1/4–3 1/4”), depending on the size: the larger the size, the further the dart should be from the center back. Remember to take into account the seam allowance and start measuring 1 cm (3/8”) in from the pattern edge.
- Mark the depth of the dart on the waist line (B) The depth should be 1.5–3 cm (5/8–1 1/4”), depending on how much ease you want to remove.

- Measure the midpoint of the dart, and draw a vertical line through it, from the bust line to hip line. (C)
- Draw the end points of your contour dart on the center line. The dart should be about 14–16 cm (5 1/2–6 1/4”) long upwards (D) and 14–16 cm (5 1/2–6 1/4”) downwards (E). The length depends on your own height and shape, and also of the depth of the dart: the deeper the dart, the longer it should be to avoid too steep darts).

- Draw the sides for the contour dart using a ruler (F).
- Finish the dart by making sure you mark its tips on the pattern and on your fabric. Sew a toile before cutting your actual fabric.

Laurie: removing a pleat
If you plan to wear your Laurie t-shirt tucked into trousers or skirt, we recommend removing the lowest pleat from the pattern. You can remove the pleat in two different ways, either by folding it closed, or by cutting and taping. You should choose the first option if you also want to use the pattern with the lowest pleat later.
First method:
- Fold the pattern along the lowest pleat stitching line.
- Match the lowest pleat stitching line with the corresponding upper stitching line of the pleat, and tape in place.

Second method:
- Cut the pattern along the lowest pleat stitching line. Then cut the pattern just below the upper pleat stitching line of the lowest pleat.
- Remove the middle piece, and match the lower piece with the upper pleat stitching line. Tape in place.

Leini: full bust adjustment
- Draw the seam allowances where necessary, and remove them if you wish.
- Draw a line along the center of the bust dart to the bust apex (A). Draw another line from above the armhole notch, to the bust apex (B). Draw a third, vertical line from the bust apex to the hem (C). Draw yet another, horizintal line, from the line C to the center front (D).

- Cut the lines open, leaving pivot points on the armhole and apex.
- Slide the side pieces apart, to open the front the desired amount. This will cause the bust dart to spread. Make sure the line C remains vertical. Slide the center piece down to level it with the hem, making sure the center front is in line. Tape in place.

- Remove the excess ease on the waist from the side, by drawing a smooth line from the waist to the bust dart. True the pleat, armhole, side and hem. True the bust dart by drawing its sides until they intersect. True the end of the bust dart.
- Add or smooth the seam allowances.

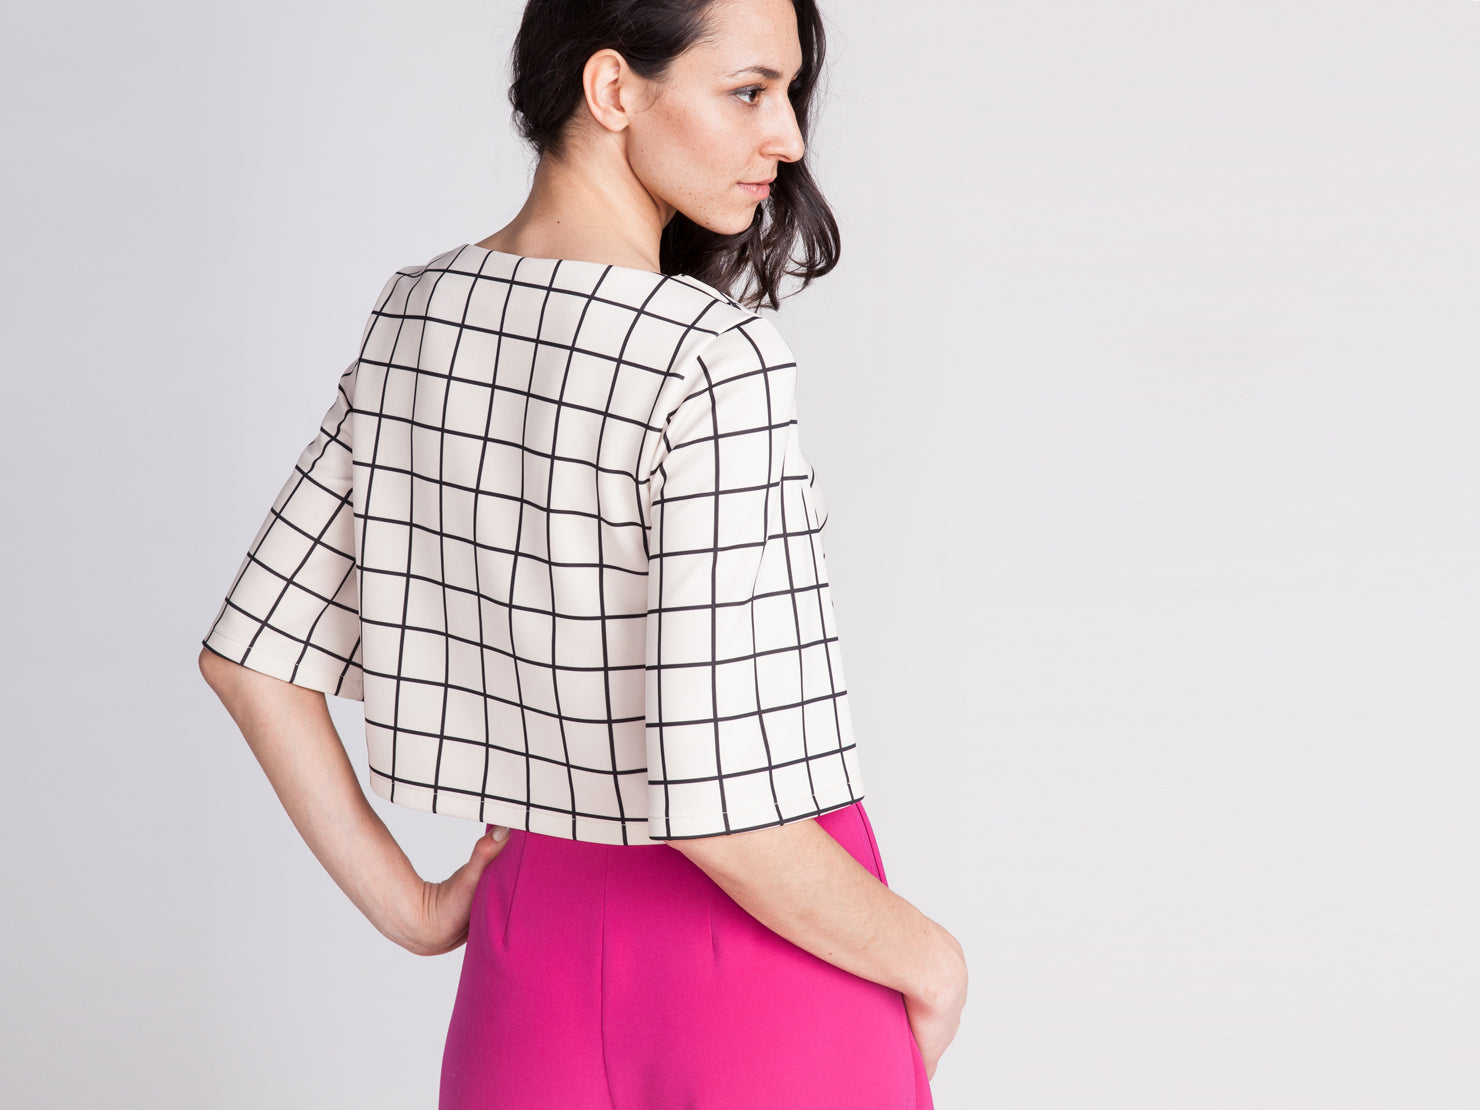
Lexi: The Lexi top pattern hack
The original Lexi pattern, launched in 2015, included a top variation in addition to the dress. The re-released Lexi pattern no longer includes this variation, but the Lexi top pattern can be easily modified from the dress pattern!

What's the difference between these patterns?
-
The top is unlined: Omit the lining pieces. You only need patterns 1a front, 2a back, 5 sleeve, 6 front facing, and 7 back facing.
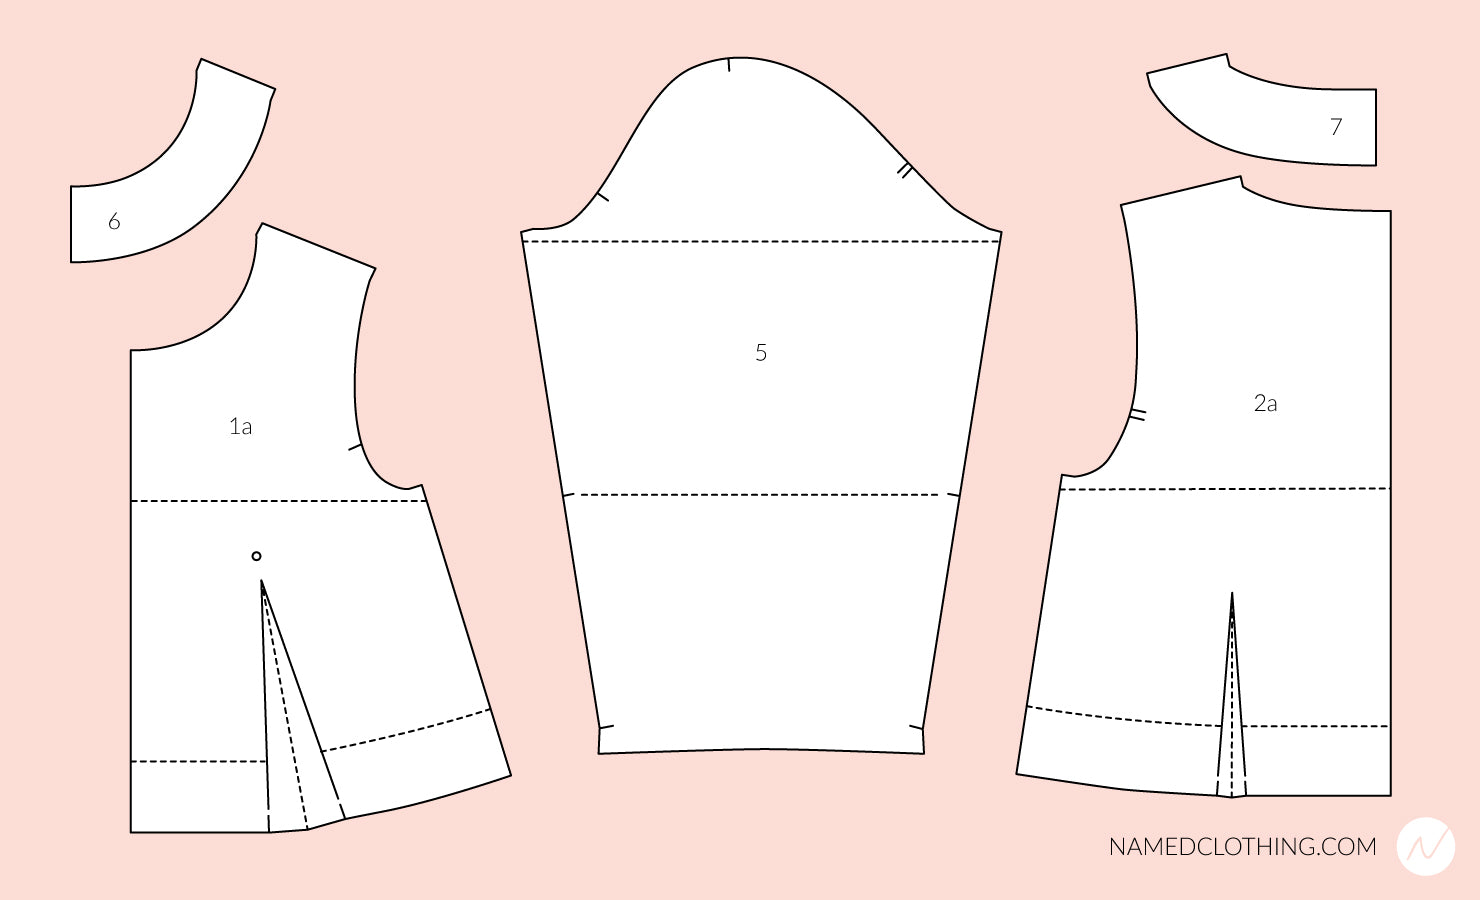
- The top is designed to be sewn from a heavy weight jersey: Remove the back zipper of the dress, and cut the back (2a) and back facing (7) on the fold instead.
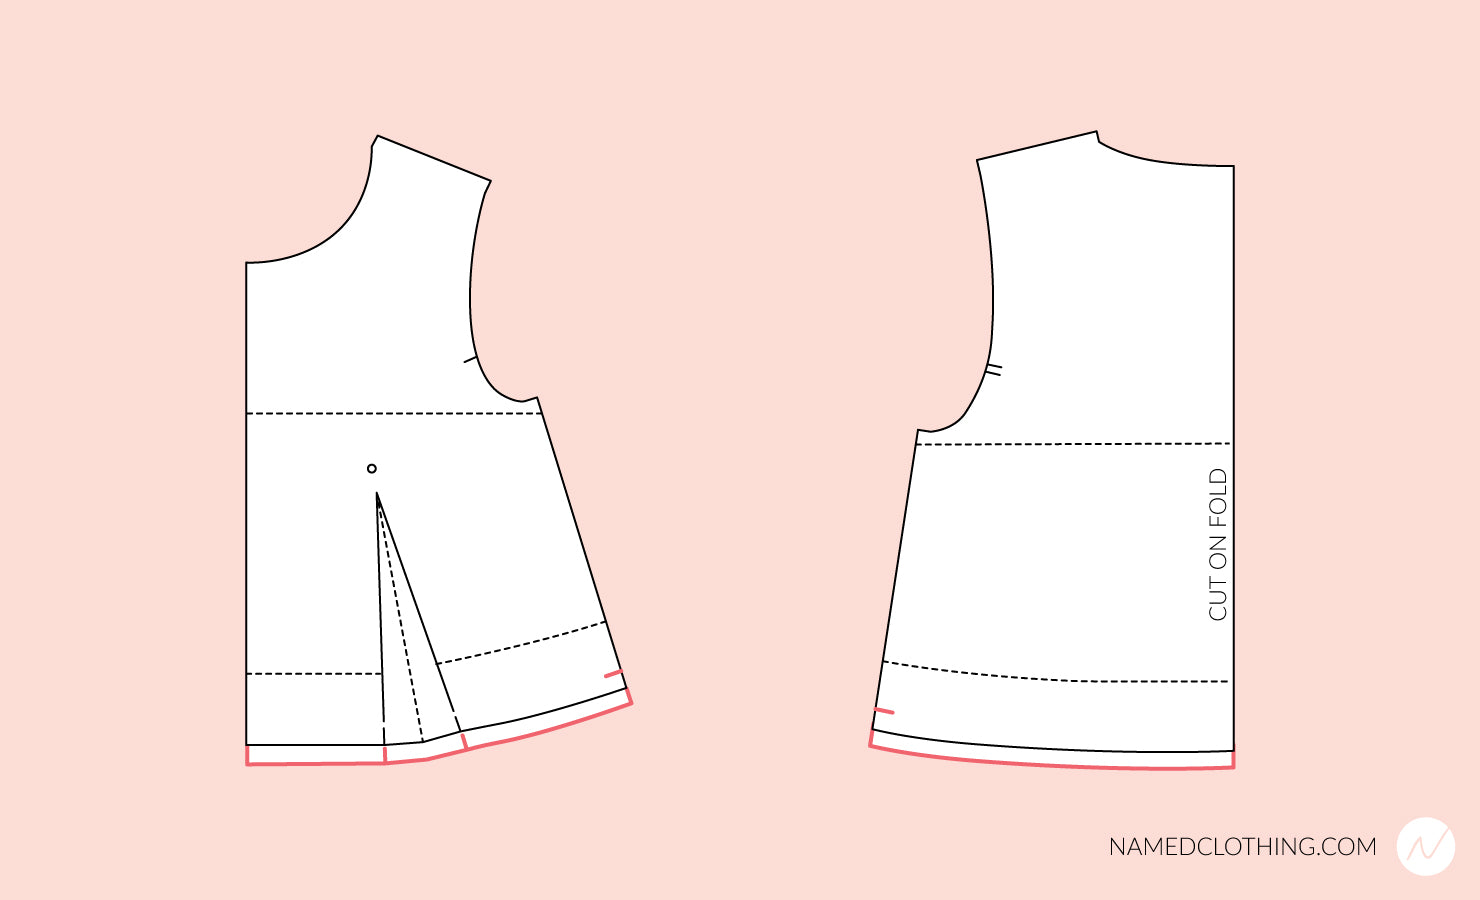
- The top comes without back waist darts: Remove the back dart, and true the hemline.
- The top is hip-length: Omit the skirt pieces, and add a hem allowance to the bodice pieces (1a & 2a).
- The top has bell-shaped half sleeves: Shorten and spread the sleeve (5).
1. Omit the zipper
Remove 1 cm (3/8”) from the center back of the back (2a) and back facing (7) pieces. Cut these pieces on the fold.
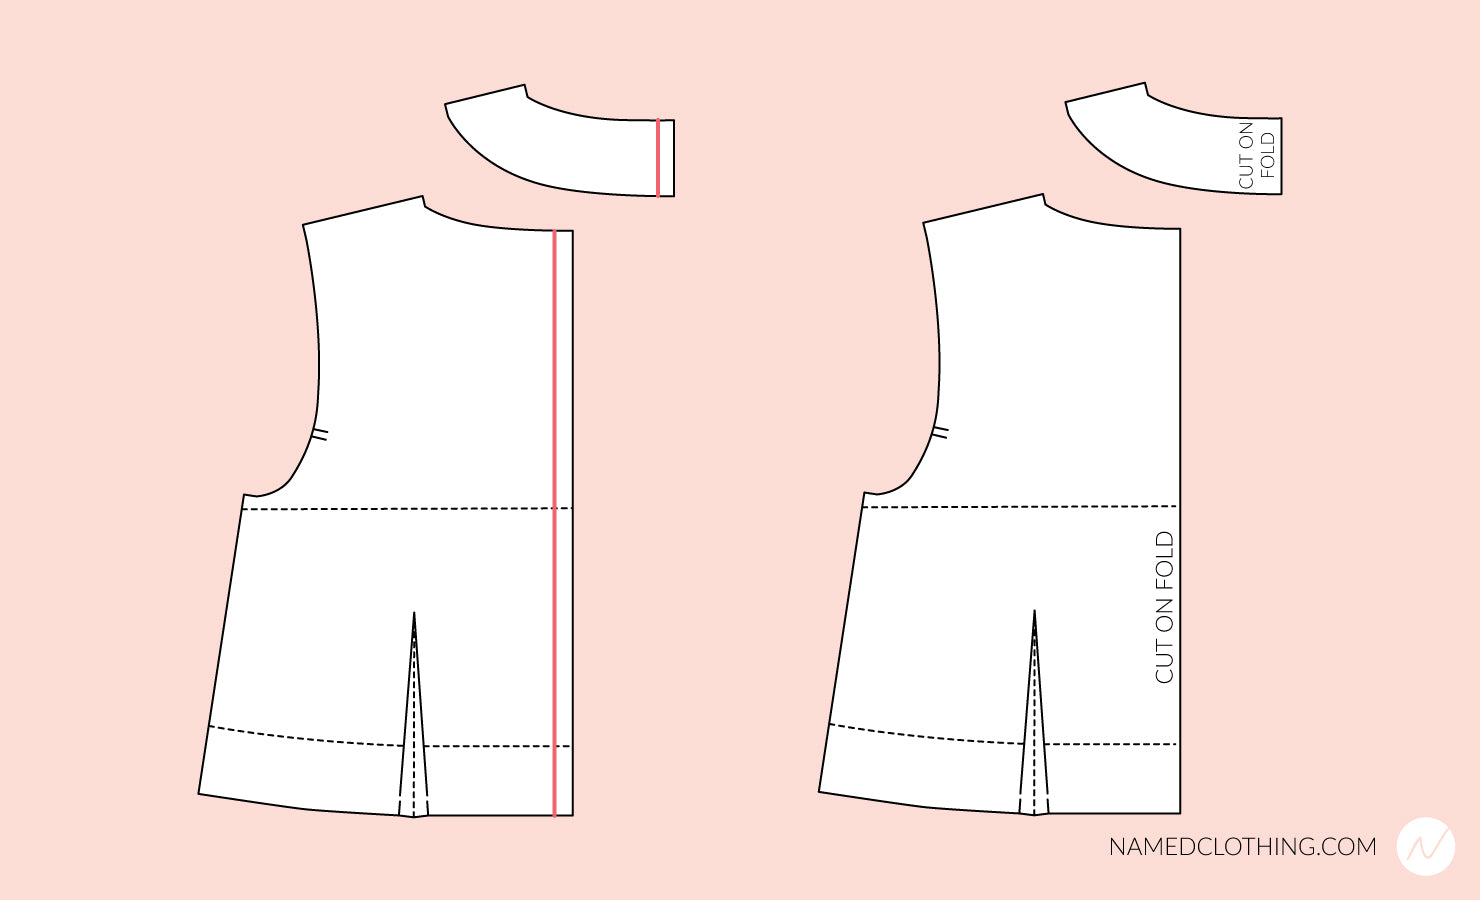
2. Remove the back waist dart
Remove the dart legs, tip, center, and notches (A). The dart width will be left for ease. True the dart by smoothing out the bottom edge (B).

3. Add the hem allowance
Add 1 cm (3/8”) to the bottom edge of the front (1a) and back (2a). If you wish, add a hem allowance notch 2 cm (3/4”) up from the bottom edge.
When sewing, serge the bottom edge, fold it to the wrong side by 2 cm (3/4”) and stitch using the straight stretch stitch on your sewing machine. Alternatively, you can leave the edge un-serged, fold it and stitch using the twin needle on your sewing machine or coverlocker.
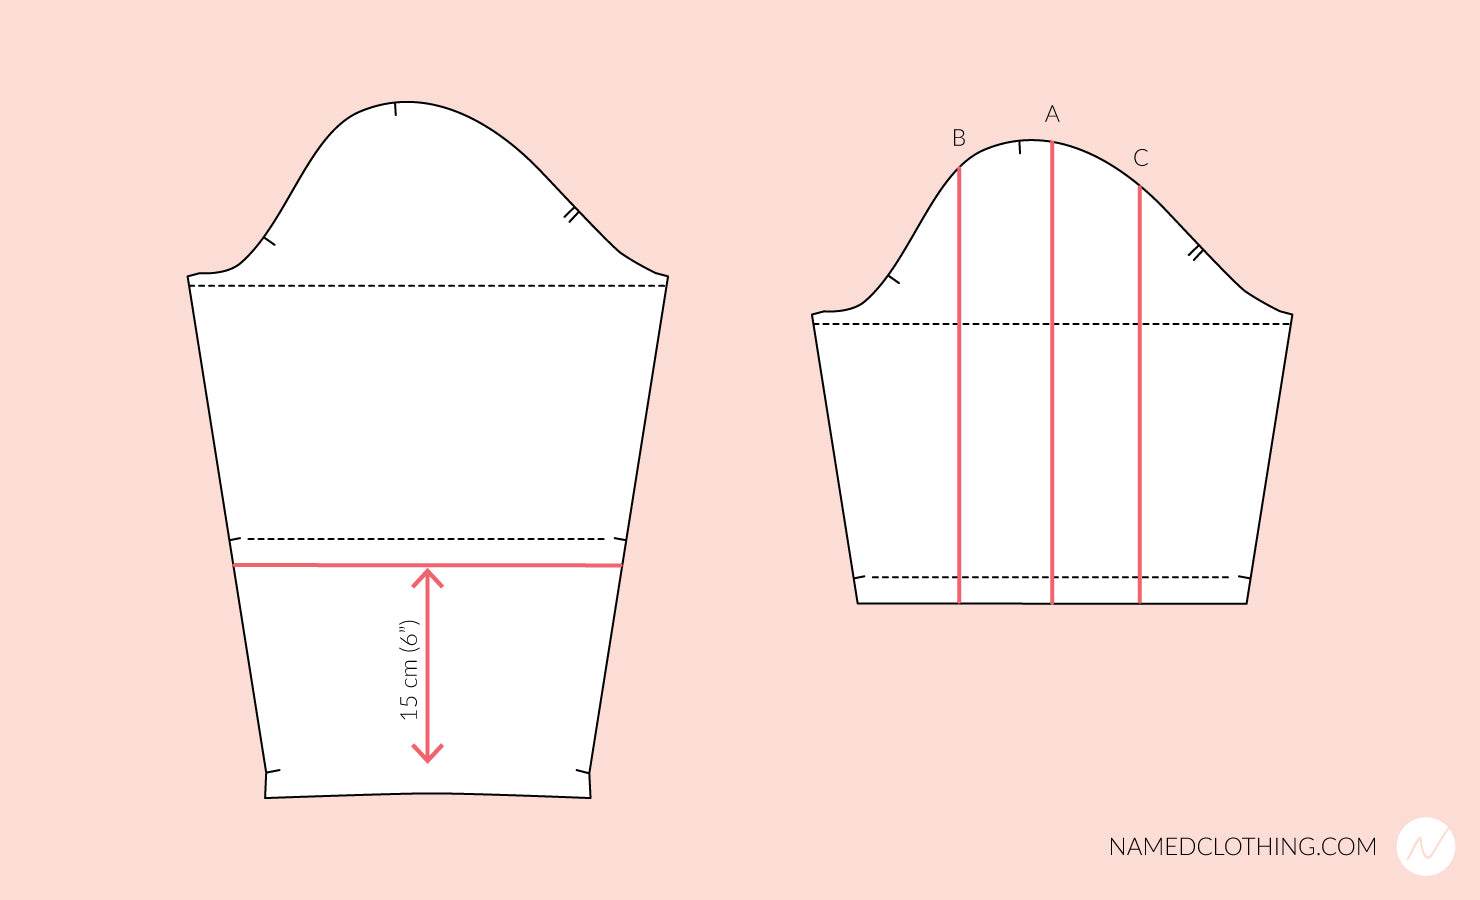
4. Modify the sleeve
- Shorten the sleeve by 15 cm (6”).
- Draw three vertical alteration lines, one at the center of the sleeve (A), and two on its either side, approx. 7.5 cm (3") apart from the first line (B & C), approximately at the spot where the sleeve cap slopes downwards.
- Cut the lines open, leaving pivot points on the sleeve cap (A).
- Spread each line open by 5 cm (2”), and tape in place (B).
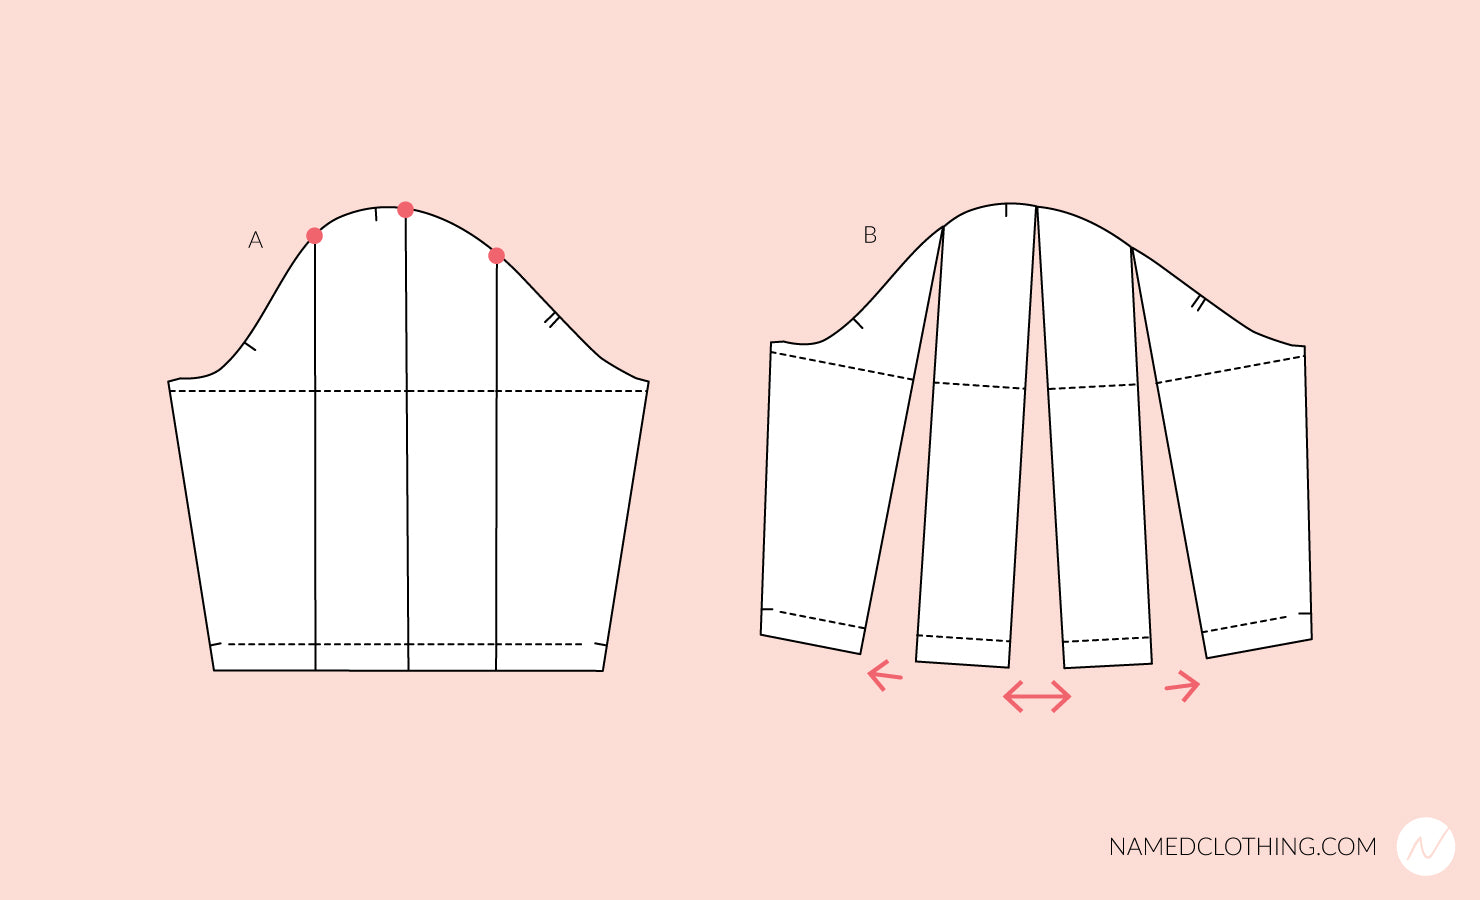
- True the sleeve cap and the sleeve end (A).
- Add a 2 cm (3/4”) hem allowance to the sleeve opening, and true its ends (B). If you wish, add a hem allowance notch 2 cm (3/4”) up from the bottom edge. Sew the sleeve openings in the same manner as the hemline turnup.
Sisko: Full bust adjustment
If you need to add a lot of ease to your pattern, we recommend adding a bust dart (see instructions under the second header).
- Draw the seam allowances where necessary, and remove them if you wish.
- Draw a line along the center of the bust dart to the bust apex (A). Draw another line from below the armscye notch, to the bust apex (B). Draw a third, vertical line from the bust apex to the hem (C). Draw another vertical line on the other side of the pattern, on the same distance from the center front (C). Draw one more horizontal line between the lines C (D).
- Cut the lines open, leaving pivot points on the armhole and apex.
- Slide the side pieces apart, to open the front the desired amount. Make sure the line C remains vertical. Spread both lines C by the same amount. Slide the center piece down to level it with the hem, making sure the center front is in line. Tape in place.

- Draw two lines from the bust apex to the ends of the opening on the side seams, and one vertical line from the apex to the hem. Cut open, leaving a pivot point on the apex.
- Rotate the side piece so that the gap on the side closes, and tape in place.

- Draw two lines from the armscye to the ends of the opening on the hem. Cut open, leaving a pivot point on the armscye.
- Rotate to close the gap, and tape in place.

- True the pattern edges and markings, and add the seam allowances back in, if necessary.

Sisko: Full bust adjustment with an added bust dart
We recommend adding a bust dart to your Sisko, if the alteration is so big that the piece opens 2 cm (3/4") or more at the line A.
- Draw the seam allowances where necessary, and remove them if you wish.
- Draw a line along the center of the bust dart to the bust apex (A). Draw another line from below the armscye notch, to the bust apex (B). Draw a third, vertical line from the bust apex to the hem (C), and another vertical line on the other side of the pattern, on the same distance from the center front (C). Draw one more horizontal line between the lines C (D).
- Cut the lines open, leaving pivot points on the armhole and apex.
- Slide the side pieces apart, to open the front the desired amount. Make sure the line C remains vertical. Spread both lines C by the same amount. Slide the center piece down to level it with the hem, making sure the center front is inline. Tape in place.

- Draw a line from the center of the opening on the side seam, to the bust apex (A).
- Mark a tip for the bust dart on the line A, 2–5 cm (3/4–2”) from the apex. The right distance depends on the size and shape of your pattern and bust, as well as of the depth of the dart: the larger the size, the further apart from the apex the dart should be. The deeper the dart is, the longer it should be, to avoid it from becoming very steep. Draw the dart from the tip to the root (B).

- True the pattern edges and markings, and add the seam allowances back in, if necessary.

Suvi: Full Bust Adjustment
How to make a full bust adjustment for the Suvi caftan mini or maxi dress.
- Draw the seam allowances where necessary, and remove them if you wish.
- Draw a line from the armscye to the bust apex (A). Draw a vertical line from the bust apex to the hem (B). Draw one more line from line B to the center front (C).
- Cut the lines open, leaving a pivot point on the armhole.

- Slide the side piece apart to open the bust the desired amount. Slide the center piece down to level it with the hem, making sure the center front is in line. Tape in place.
- Measure how much the pattern has spread at line B, and remove that much from the side.

- True the armhole by drawing it straight. Smooth out the hem, and measure that the side seam is the same length as in the original pattern. Redraw the cord casing lines, but also try the garment on before sewing them in place to ensure their position is correct.
- Add or smooth out the seam allowances.


