Basic Sewing Instructions
Preparing and cutting fabrics
Prewashing fabrics
It's extremely important to pre-wash all materials prior to cutting, as it will prevent the finished garment from shrinking during the first wash. Pre-wash and iron all fabrics and linings in accordance with their care instructions. Wet and air dry the interfacing too. If the fabric frays easily, serge the raw edges before washing. If the fabric does not allow washing you can steam it carefully before cutting.

Press the pre-washed fabric carefully before cutting. Do not cut a wrinkled fabric as the shapes of the pieces may become distorted. Do not iron the interfacings.

Cutting fabric
When cutting, set the fabric down on your work surface as neatly as possible and take care that its warp and weft or knit are vertical and horizontal. A poorly or incorrectly oriented fabric can cause the pieces to become distorted.
Pieces are usually cut from double thickness, whereby the fabric is folded with right sides against each other, selvages together. If only one of a piece is needed, cut it from single fabric, with the right side facing up and the drawing side of the pattern also facing up. Similarly, fold the interfacing with glue sides together, or for single thickness the glue side up (unless otherwise instructed). If separate left and right pieces are marked onto the same pattern piece with lines, cut the left piece with the drawing side upwards and the right piece with the drawing side against the right side of the fabric. Note that whenever you cut a piece with the drawing side down, copy all markings to the back side of the pattern so you can mark them on your fabric.

Always position the patterns as close together on your fabric as possible, to avoid waste. Using a measuring tape, check that the grain line arrow on the pattern is parallel to the fabric’s fold or selvages. First, measure the distance from one end of the arrow to the selvage or fold. Hold the pattern in the same position and also measure the distance from the other end of the arrow and, if necessary, from the middle or from more points. Tilt the pattern if necessary to make the distance equal from all points. Attach the pieces to the fabric with pins or weights.
Pieces that are cut along the fold of the fabric are placed on the fold and do not include an arrow indicating thread orientation. With these pieces, position the pattern on the fabric so that its fold line precisely matches the fold of the fabric.
Cutting interfacing
Cut the interfacing using the same pattern as the piece it supports, but trim approximately 8 mm (1/4”) off from its seam allowances. This way the interfacing does not make the seam allowance stiffer, but does extend under the seam joining the pieces together, which will help in securing it in place. The inner edge of interfacing, which is to be left open, is cut in a zigzag shape, either with pinking shears or fabric scissors. This makes the edge of the interfacing more elastic and prevents strain and the edge being visible on the outside of the clothes.
Pattern markings
Pattern markings are used to match pieces, and to mark the position of, for example, stitch lines and details. Copy the pattern’s markings onto the pieces using scissors, dressmaker's carbon paper and roller, pins and thread.
Cutting notches on a pattern
Notches help in matching pieces correctly. Make a short cut at the edge of the piece where the notch marking is. Notches are always cut into the edge of the fabric, never the middle of a piece, and they may not be deeper than the seam allowance. On some pieces, double notches – two notches next to each other – are also used to make lining the piece up easier. Double notches are matched with other double notches. Additionally, centre front and centre back notches should be cut on pieces that are cut on fold. Cut a centre notch at the point where the piece folds, on the seam allowance. If your garment has two almost alike pieces - for example similar front and back pieces – you can differentiate them by marking one with single and the other with double centre notches.

Marking with dressmaker's carbon paper and a tracing wheel
Carbon paper is used to mark the likes of darts and stitch lines, and lines are drawn onto the reverse side of the fabric. Prior to removing the pattern paper from the cut pieces, place a piece of wax paper between the pattern and the fabric, and another under the piece, with the wax side against the reverse side of the fabric in both cases. Imprint the line from the pattern onto the fabric using a roller and remove the wax paper.

Marking with pins
Pin markings are used to mark points, such as the tips of darts, the locations of buttons and pockets and other positioning points. The pins can be placed on either the reverse or the right side of the fabric, depending on which side the markings are needed on. Prior to removing the pattern pieces, press the pin through the pattern and fabric at the point of the marking. Turn the piece around and mark the point where the needle has come through on the reverse side of the lower piece, using a pin. Keep the pin in the pattern and carefully open the pattern paper so that you have pin markings on the reverse side of the upper piece too. Then remove the pattern paper from the pieces. If necessary, move the pin to the right side of the fabric.
Using tailor's tacks
Thread markings are used in the same way as pins, but they are recommended when the markings will need to stay in place for some time to come. Pins can be lost, which will also mean that the location points are lost, but tailor's tacks will stay in place more securely. First, copy the markings from the pattern to the fabric using the above method for pins, and then replace the pins by tying a short piece of thread through the spot, on either the right or reverse side of the fabric.
Matching and sewing
Pinning and basting
Pin or hand baste each seam before sewing. When pinning, place the pins so that the pinheads are oriented in the direction of sewing or towards the seam allowance. This makes the pins easy to remove. We recommend basting parts that are difficult to align. This means sewing them together by hand with a loose stitch before sewing the final seam. The basting thread should always be removed after the final seam has been sewn.

Matching pieces
Always match pieces so that the notches are matched. In some cases, the seams or darts, for example, may also need to line up with each other or with notches. Always position pieces, notches and seams so that they line up at the stitching line, not at the raw edge of the piece. If it helps, you can draw the stitching line on your piece using chalk, and utilize a pin in matching the seams.

Seam and hem allowances
Unless instructed otherwise, always sew seams along the line of the seam allowance so that the right sides of the pieces are facing each other. Our patterns usually include a 1 cm (3/8”) seam allowance, and whenever another seam, turnup or hem allowance is used, these are marked on the pattern and included in the instructions. Our patterns never require the customer to add seam allowances – if the seam allowance marked on the edge of the piece is 0 cm, the edge is left open and is not connected to another piece, hemmed or otherwise sewn.

Adjusting stitch
Choose a suitable needle and set the stitch type on your sewing machine to suit your fabric. Test the stitch on a test swatch before starting sewing. You can increase or reduce the thread tension to get a stitch that is neither tight or loose, and that looks the same on both sides. You should also try lightly pulling the pieces away from one another, to check that the stitch is not too long or loose. Remember to replace your needle with a new one often. Bent, broken or dull needles can cause poor stitch quality, skipped stitches or even damage the fabric.

Back stitching and knotting
Back stitch at the beginning and end of each seam, unless otherwise mentioned in the instructions. Back stitching at the start of a seam: Start sewing a few stitches’ length from the edge of the piece, reverse to the edge, and then continue sewing the seam forwards. Back stitching at the end of a seam: Sew to the end of the seam, reverse for a few stitches, and then sew back to the edge of the piece. For visible top stitching you can finish the seam in a tidier manner by knotting the threads: Use a needle to pull the upper thread through to the reverse side, and fasten off by knotting the upper and lower threads together a few times.

Finishing raw edges
Raw edges of the pieces should be finished to prevent them from fraying or unraveling. It is easiest and most reliable to do this on a serger/overlocker, but you can also use the zigzag stitch on the sewing machine for the finishing. If you use a sewing machine for this, choose the widest possible stitch that is still relatively short. Consult the instructions carefully to establish whether the seam allowances are to be finished separately or together.

There are also various types of seam that close up the edge of the fabric and which do not require finishing. These seams include French seams, flat felled seams and bound seams (see 'Seams and stitches' below). Edges that are left entirely within constructions (such as collars and belts) also do not need to be finished and attempting to do so would simply increase the thickness of the seam allowance.
Seam types
Plain seam
The most traditional, common and easy-to-sew seam, in which the pieces are pinned together so that the edges match and sewn together with a straight stitch along the line of the seam allowance, which is most often 1 cm (3/8”) in our patterns. The plain seam is light and simple, making it suitable for sewing all kinds of fabric and complicated constructions.

If the edges of the piece are left visible on the inside of the garment when using a plain seam, they should be finished (serged) before or after the seam is sewn. If the seam is enclosed inside a construction, such as a waistband, collar or lining, the seam allowances do not necessarily need to be finished.
If the seam is to be ironed open so that the seam allowances are folded onto both sides of the seam, the edges of the pieces should be finished before sewing the seam. If the seam allowances are to be ironed so that they both fold the same way, for example, if they are to be stitched or understitched, the seam is sewn first and the seam allowances are then finished by serging them together. It is also advisable to finish seam allowances by serging them together and ironing them to fold to one side when working with thin fabric. This leaves a neater finish, and the resulting thicker seam allowances are not thick enough to be visible on the right side of the garment.

Serger seam
A serger is used to finish the edges of woven fabrics and to sew knit fabrics. For both of the aforementioned, a serger is usually the best and simplest option, so a good serger is a worthwhile investment for anyone who does a lot of sewing.
To avoid narrowing the piece when finishing woven fabrics, the edge is fed through the serger so that the serger’s blade barely cuts any fabric. You can think of this as shaving untidy thread ends away.
When sewing the seams of jersey garments, you can allow the serger to cut a narrow, approximately 1–2 mm (1/16”) strip of fabric from the edge as it is included in the pattern’s 1 cm (3/8”) seam allowance.

French seam
A French seam is a more thoroughly finished and refined option in comparison to the plain seam. The seam is sewn in two parts so that the edge of the fabric is entirely enclosed inside the seam and no further finishing is needed. The seam allowances in a French seam are wider than those of a plain seam, usually about 1.5 – 2 cm (5/8 – 3/4”). Because the French seam has a heavier construction, it is best suited for light fabrics and simple constructions. The French seam is the best option for light, sheer fabrics where finishing done with a serger would appear untidy when seen through the fabric.
Unlike plain seams, French seams are sewn with the pieces placed so that their wrong sides face each other. Then the pieces are pinned and sewn together, usually with a 5 mm (1/8”) seam allowance. Then the pieces are folded carefully with their right sides facing each other and ironed so that the first seam’s stitch line is in the middle of the fold. A new seam is then sewn about 7 mm (1/4”) from the fold so that the seam allowance is left entirely enclosed within the stitching. Finally, the seam is ironed to neaten it.
Flat felled seam
Flat felled seams are often used in jeans – particularly for the inseam and crotch seam – because they are very strong and durable. Flat felled seams are also commonly found in blouses. With a flat felled seam, the seam allowances of the two pieces are different. For example, one may have a seam allowance of 1 cm (3/8”) and the other 0.5 cm (1/4”). Depending on the instructions, the seam can be sewn by pinning the pieces together with different seam allowances or by sewing the seam normally with the edges together and trimming one of the seam allowances afterward. After the seam has been sewn, the broader seam allowance is folded double over the narrower seam allowance and ironed, then the whole seam allowance is ironed onto the side of the narrower one and stitched together from the right side of the fabric.
Because flat felled seams often require a heavy-duty sewing machine, particularly when working with jeans and garments made of other thick fabrics, we often use a lightened semi-flat felled seam in our patterns that is lighter but also less durable. The semi-flat felled seam is otherwise identical to the unmodified seam except for the wide seam allowance being finished (with a serger, for example) and not folded over the narrow seam allowance. Instead, it is simply ironed over the narrow seam allowance and then stitched.
Hand sewing
Almost all projects require some sewing by hand, and hand sewing can be used for finalizing constructions, such as sewing a facing onto the back side of a zipper closure, attaching hems to the seam allowances to secure them in place, or sewing closed turning gaps. It can also be used for finishing or neatening up any seams, as well as attaching such things as buttons, hand-sewn snaps and hooks and eyes.

Top stitching
The visible stitching on the outside of a garment, that is used both to reinforce the piece and as decoration. The stitching that fastens turn-ups, hems and patch pockets is also considered to be top stitching. Top stitching is particularly common on jeans and jackets, but is also used frequently on the likes of blouses. You can opt to use a thicker top stitch thread and a contrast color on your top stitching. Depending on the thickness of the fabric and stitching thread, top stitching often features slightly longer stitch lengths than normal.
When top stitching, first press the seam allowances towards the piece to be top stitched, and stitch at a distance of approximately 1.5–2 mm (1/16”) from the seam or the edge of the piece.

Under stitching
Under stitching is technically the same as a top stitching, but it is never meant to be seen on the outside of the garment; instead it is intended to support the structure and keep the seam allowances in place. Therefore, you can use a regular thread and normal stitch length for under stitching. Under stitching is sewn on the lining or facing side, at a distance of approximately 1.5–2 mm (1/16”) from the seam to be stitched, through lining/facing and seam allowances.
Machine basting
Machine basting is used like – or in addition to – pins or hand basting to attach pieces or structures before the seam is sewn. Machine basting is an excellent help in sewing the likes of pleats and collars, as well as some belts and bands that are sewn between two pieces. Machine basting is carried out on a sewing machine at a distance of approximately 5 mm (1/8”) from the edge, and it does not need to be removed after sewing the actual seam, unless it is straining the fabric or is accidentally visible.

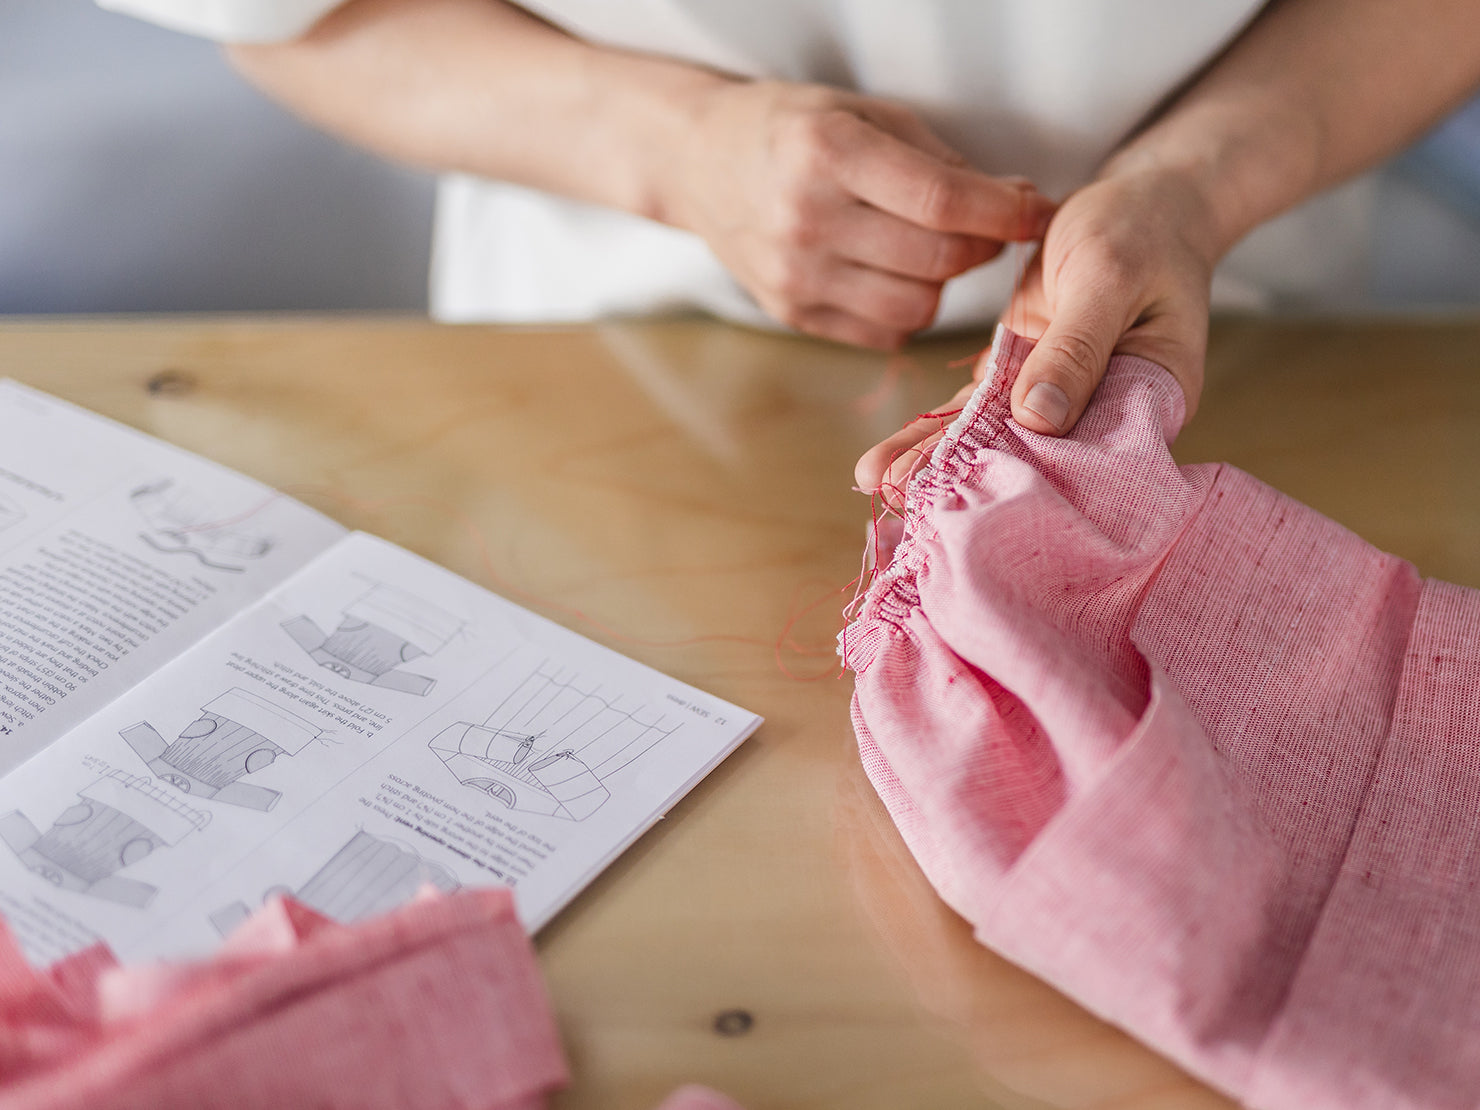
Easing and gathering/ruching
Easing stitch is an assistive stitching sewn with a long stitch length, used to create ease or ruching in the piece. When creating ease, the ease stitching is sewn within the seam allowances of the piece, approximately 5 mm (1/8”) from the edge. Ease is formed by tightening the bobbin thread, and its intention is to create roundness and softness, without wrinkles or ruching. When creating ruching, another line of ease stitching is sewn at a distance of approximately 8 mm (1/4”) from the edge, and ruching is formed by tightening both bobbin threads. The ease stitches are always removed after the seam has been sewn.
Seam allowance treatments
Seam allowances are graded, trimmed and clipped, in order to make them as unnoticeable as possible, with no bulging or straining. Always take care not to cut too close to the stitching to avoid the stitching or the fabric unravelling.
Grading seam allowances
Seam allowances are graded in places where they are sandwiched between two pieces (e.g. collars, belts, cuffs and similar), to blend them into the piece neatly with no obvious ‘step’. When grading, trim approximately 5 mm (1/8”) off of the seam allowance of the inner piece, using scissors.
Trimming corners
Seam allowances are trimmed in corners so that the corner turns nicely without being thickened by the seam allowances. When trimming, cut the seam allowances off diagonally towards the point of the corner.
Notching and clipping curved seams
For seams curving outwards, small V-notches are cut into the seam allowances, in order to avoid bulging. For seams curving inwards short cuts are made in the seams so that the seam allowances do not strain when turning the right way round. This is called clipping.


